Author: @BacteriaMage

Ogre Battle Army Tool

Ogre Battle: The March of the Black Queen is one of my all-time favorite games. I’ve been a fan of the story-telling genres of video games ever since I first discovered them but Ogre Battle and its sequels have always had special appeal. The really killer element, I think, is the character building aspects expanded to not just a small cast, like most RPGs, but to an entire army.

When I first played Ogre Battle I had never seen anything quite like the army and unit editing screens and it was one of the things that hooked me on the game. But, compared to later Ogre Battles (and Final Fantasy Tactics) it’s somewhat lacking. For this reason I’ve always wanted to create an alternative editor that incorporated added functionality and quality-of-life improvements that surpasses even those subsequent titles.

I envisioned something with a fancy graphical interface and that was probably browser-based to make it widely accessible. Beyond a mere unit editor, it would make it possible to level characters up or down, just edit their statistics directly, or even generate them from scratch following the game’s rules. Import, export, and transfer functions would make individual characters portable and some kind of analytics suite might rate them against the best-case growth curves.

My latest project is the Ogre Battle Army Tool and it opens the door to all of this but falls short of my grandest visions. It’s a Windows app that can export and import all the characters and units using a CSV file that works with any spreadsheet application. It’s not an editor by itself but since all the army data can now move in and out of an easy-to-edit format it makes all the fancy manipulations I envisioned possible, albeit performed manually. I, for one, work with data in spreadsheets regularly and find that managing my troops in rows and columns is quite natural.

The tool and its C# source code are now available for download on GitHub. I make it available hoping my fellow Ogre Battle fans will find it useful. If it generates enough interest I might expand it further to include some more of those neat features like character generation. Importing and exporting the item inventory isn’t out of the question either. Maybe someday I’ll still build that cool editor but, don’t hold your breath.

The Incident in 15 minutes

Sometime back I posted a set of Game Genie codes for The Incident by KHAN Games. My favorite code forces the game into the pre-recorded solution mode so that game starts solving (auto-playing) the puzzles on its own. The point is to get the game to play itself but that code falls a little short: It’s not continuous end-to-end play because each “floor” (block of ten puzzles) has to be started manually. Also, getting the system to award solution points for “solving” the puzzles requires yet an additional code (since they normally aren’t when auto-play is used). And finally, there’s actually a bug in the code that breaks one of the later puzzles.

Never-the-less, getting The Incident to play itself from start to finish entirely unattended (almost) is something that I’ve been thinking about since. More recently, I created a new version of the auto-play code that attacks the game’s subroutine that checks the state of the auto-play flag rather than the code that resets it (which is how the earlier code worked) and this is much better. It doesn’t break any puzzles, it doesn’t require an extra step to start it, and it awards solution points (as if you solved the puzzle manually) without any additional cheat codes.

PZKVPNOK Auto-play
VXKVYZZA Skip floor-complete screen
NVSTAXXT Skip floor-complete screen

This gets us closer to end-to-end play but the summary screen that appears at the end of each floor requires pressing start to proceed. This prevents the game from just running through the first 100 levels without stopping unless you are standing ready to press that button each time. I managed to find an additional two codes that basically trick the screen into thinking start has been pressed and this allows the game to run uninterrupted from stage 1 to 100.

This just leaves the final 20 stages for the “Kate” and “Claire” robots which need to be manually started and then the final three robot push at the very end of the game. With enough effort it might be possible to come up with a patch that manages to skip all that and truly play 100% automatically but the Kate and Claire sections of the game are pretty short and easy enough to manually kick off so I called this good enough.

The game playing itself for 100 levels uninterrupted is pretty impressive especially at high speed so I’ve uploaded a video of it to YouTube. This was played on Mesen and recorded using OBS Studio. I set the emulator to 10x speed on fast forward but I’m not sure that it’s actually running that fast. It may just be at whatever speed it happened to max out but I think it’s sufficiently fast and the whole game plays in just over 15 minutes. The ROM was just the plain GTROM version that I dumped from an original cartridge back in 2017 (My MMC1 patch wasn’t used because of the visual glitch it has).

While my new auto-play code doesn’t break any of the puzzles directly it does have an issue where it causes the robot to move automatically during the security camera footage scene that appears when each robot is introduced. This has no ill effect for Sam and Kate but it does break the first puzzle for Claire if left on. To avoid all this in the video I just manually switched the code on after the screen camera scene was over. It’s pretty seamless for the video but keep this in mind if you want to use these codes yourself.

That’s about all there is to it but I’d like to mention that me posting this has nothing to do with Kevin’s pre-order for the re-release for this game. I had already been working on putting this together before Kevin announced the re-release and I had no idea it was coming; merely a coincidence. On that note, I do not know if any of my old codes or these new codes will work with the new version of the game. It depends on if any of the existing 6502 code gets moved around by the new changes. Guess we’ll have to wait and see.

Patch scripts released for The Incident, Scramble, and KHAN 4-in-1.

GtromAnthology

In response to my post earlier this month, How I learned to play The Incident and other GTROM favorites sans the cartridge, Kevin Hanley of KHAN Games gave me his permission to publicly post my GTROM-to-MMC1 patches for all of his games. I’ve uploaded the patches for The Incident, Scramble, and the KHAN Games 4-in-1 Retro Gamepak to my Neocities homepage.

https://bacteriamage.neocities.org/gtrom/index.html

Each archive contains the patch source, pre-assembled code, a patching script, and some directions to get you going. I have not included the ROM since that is still Kevin’s IP. So, you’ll need to dump the ROM yourself before you can apply the patch. I did include my original dump script though if you happen to have access to a Kazzo.

How I learned to play The Incident and other GTROM favorites sans the cartridge

GTROMTitle

A lot of excellent new NES homebrew has been published on GTROM based cartridges over the past few years. Most other homebrew is distributed using boards compatible with various classic or existing mappers meaning if you have the know-how and the tools to dump the ROM yourself then you can play them on any number of compatible emulators. But, for GTROM emulator support is still uncommon (although improving recently) so a ROM image for a GTROM based game doesn’t do you much good unless you take more drastic measures.

A long time coming

Arching and preserving games is something that has always been important to me and GTROM presents challenges in this area. I knew this was a topic that I wanted to explore and discuss even before I became at all active in the NES community or started this blog. This blog is now well over a year old but I’ve yet to touch on this topic because of the size and scope of the composition along with fears around how it would be received by the wider community.

But now, I feel like the relevancy is slipping away. This is because there has been a recent shift in the community towards ROM releases alongside or even in place of cartridge copies and with growing emulator support I suspect digital GTROM releases probably won’t be far off either. So, in short, it’s now or never. Case-in-point, Kevin from KHAN Games announced the discontinuation of the cartridge version of the Incident the day after I started work on this article.

KHANTweet

No ROM for you

Having paid in full, I feel entirely within my rights to dump these ROMs, modify them, and play them however, whenever, and wherever I choose. However, I don’t think those rights extend in any way beyond what affects me directly. For that reason, while I would be happy to share my patches–eager even–I would not do so at this point without the permission of each individual title’s creator; so don’t ask. Beyond that, maybe in some far-flung future where the developer has long since vanished from the community I’d consider releasing the ROM simply to ensure preservation of the title.

The Incident

The Incident was one of the very first homebrew cartridges I purchased and was the first GTROM game I owned or ever attempted to patch. The desire to have a backup copy and also to be able to play this game on mobile was really the driving force behind this entire endeavor.

Developing this game’s patch took the longest and I learned the most doing it as it was my very first attempt. That probably comes as no surprise but actually this game threw up a unique challenge involving a visual glitch from a timing bug that I have never fully resolved.

TheIncidentRev1

KHAN Games 4-in-1 Retro Gamepak

KHAN Games 4-in-1 Retro Gamepak was the next one I tried after my first mostly successful patch for The Incident. Again, I wanted to patch this one because I feel like the fishing game in it is just perfect to play on-the-go. It’s relaxing and doesn’t require a lot of effort when you are some place where you’re bored but really don’t want to have to think or do anything. What could be better?

As a whole this cartridge presented several new challenges. One was that (because it uses a larger percentage of the GTROM’s flash memory than The Incident) patching it required keeping the ROM size at 512 KB which complicated the MMC1 programming needed to switch banks in the oversized ROM. It also actually makes pretty significant use of the page-flipping CHR RAM capabilities provided by GTROM. The latter created an interested visual quirk in Sneak ‘n Peak which, again, I have never fully resolved.

SNPMMC1

Spook-o-tron

Spook-o-tron

For Spook-o-tron I got lazy. I originally tried to use the MMC1 mapper that I finally used with The Incident and the 4-in-1 pak so that emulators could save the high score list. However, the MMC1 patch kept crashing because, I think, it was getting interrupted in the middle of a bank switch.

I ended up just falling back on the simpler UxROM patch like my original attempt for The Incident. This works well but the high score list doesn’t save between power cycles. It doesn’t matter to me because I suck at this game and can never beat the lowest score on the default high score list anyway. If that sounds familiar then try the Game Genie codes I posted last year.

Scramble

Scramble2

Scramble received a lukewarm reception (or so I hear) in the homebrew community but I can’t really imagine why since I really enjoyed it. This one actually plays better on the AVS for the online scoreboard support. Plus, it doesn’t play well on a phone unless you have a gamepad with physical buttons (or at least that’s true for me). So, patching this really fell more under the “just because” umbrella than the others. All the same, I’m glad I did patch this since the patched version is absolutely perfect with no outstanding issues thus giving me a warm and fuzzy feeling.

By this point I had really hit my stride and the entire process became routine. The only really new challenge was the need to reinitialize the default high score list when the ROM was run without an existing .sav file accompanying it. I took the opportunity to really improve my overall approach and the sophistication of the patch and, of course, to give credit where credit is due:

Scramble

Swords and Runes

SwordsRunes

Swords and Runes is distributed on a GTROM board but I’ve found that it’s actually an NROM game and so it didn’t really require any patching. The GTROM cartridge contains a startup stub program which first copies CHR data from PRG into CHR RAM then just switches to another PRG page which contains the entire 32 KB program and finally jumps to its entry point address. From there the game behaves exactly like any NROM game with a CHR ROM.

All that was necessary to get this run in the emulator was to dump the GTROM, copy and paste the PRG and CHR data into a ROM file with an iNES header, and finally fix the “reset” vector in the PRG ROM to point directly to the game’s entry point address. There’s nothing else to patch since the game has no bank switching logic that needs to be updated because it all fits within a single 32 KB bank plus the 8 KB of fixed CHR data.

Dumping GTROM

I needed a copy of the ROM for the original version before I could really even seriously consider whether I wanted to try and patch any of these titles or how I might go about doing that. As I am working on this article, Paul over at Infinite NES Lives has been busy adding support for writing ROMs to GTROM boards and so I can only assume dump support won’t be far behind if it isn’t there already. However, two years ago when I first started this project there was no out-of-the-box solution for dumping GTROM games.

I had no knowledge of or means to download the ROM of a GTROM or any other NES game at that point and, indeed, whether I could weighed heavily on my decision on if I really wanted to even get involved much with NES homebrew at all. I even sent a feeler out to Kevin to see if he’d be willing to share the ROM (he politely reminded me that it wouldn’t work in my emulator). Finally, after a lot of agonizing and research I concluded I could probably write an Anago WX script to extract the ROM via Kazzo (the ancestor of the INL Retro) so I ordered one and the rest, as they say, is history.

Choosing a replacement mapper

Mappers are really extensions of the NES system; they add new features that the base console doesn’t have. In principle, a given game that needs a set of specific added features can be run on any mapper which is capable of providing all of those features in some form. This is what makes mapper hacks or patches like this one possible at all. Each mapper could work differently though and provide the same basic functionality in different ways. A big part of developing a patch is just figuring out what the game was telling the old mapper to do and then changing it just enough to tell it do the same thing with the new mapper.

Despite being a simple and inexpensive mapper, GTROM actually packs a punch and incorporates at least two features which are more advanced when compared with classic NES cartridges. Those features are a 4-screen nametable and also extra on-board general purpose RAM. Fortunately for us, although maybe a disappointment for Memblers, is that none of the games I’ve patched so far have made use of these features and so they can be ignored.

The main feature used by all these games is just simple bank switching in the PRG ROM and also non-volatile storage for saving games or statistics between play sessions. They also use CHR RAM which I treated as a requirement but in retrospect it could have actually been worked around. I didn’t really fully understand any of this coming into this project though. I muddled through experimenting with several different mappers trying to get things to work perfectly the way I wanted but generally falling short of perfection.

Page rearrangement

Nearly all mappers provide bank switching in some form but it doesn’t just make any two mappers interchangeable simply because they both incorporate this feature. The reason is that there is more than one way to “map” the memory of a larger storage chip into the smaller space provided by the NES’ 16-bit addressing. In order for two mappers to be interchangeable they both must do this mapping the same way or at least in a way that can be made compatible.

GTROM bank switching works in the simplest way possible by splitting its 512 KB into sixteen individual pages of 32 KB and allowing any one to be selected at time. Perhaps unexpectedly though is that none of the games in this article actually work this way. All four use a paging scheme strongly resembling a UxROM style mapper where a single 16 KB page is fixed and always visible to the CPU while a second 16 KB bank can switch between one of multiple possible pages. But since GTROM doesn’t do this, all these games actually accomplish it by just duplicating the same information in the second half of each page to create a faux fixed bank. The original GTROM literature from Memblers describes this process as “interleaving” and he later released a general purpose tool which helps duplicate data for this purpose.

Bank Compare Diagram

One practical implication of this is that it means the raw data on the GTROM’s flash chip, and therefore in the ROM file, is arranged differently than would be expected by another otherwise compatible mapper. So before the ROM’s code can even be patched, the data itself must be rearranged to put the pages in the correct sequence and to also eliminate the duplicate data. In my original attempt I did this manually by copying each 16 KB page separately using a hex editor. Later on, I automated this processing using a build script.

Rearrange Diagram

UxROM Patch

Once I had dumped the ROM and rearranged the data the next step was to actually update the game’s code to communicate with the replacement mapper. There are at least several mappers that can arrange their banks in the way these games expect but probably UxROM is the simplest to program so it’s the one I tried first. What this involves is finding all the spots where the game is programmed to change the selected ROM page and replace the GTROM specific code with UxROM code that does the same thing.

This is actually pretty simple since the debugger feature in FCEUX makes it easy by allowing a breakpoint to be set for whenever there is a write to an address which contains the GTROM’s control register. Once the code is located then it’s just a matter of writing new code to replace it, assembling it into binary code, and then pasting it over the old code in the ROM. This is especially easy for UxROM since the way the pages are switched is by just writing a byte to a register. That’s actually very similar to how GTROM already works but UxROM is slightly more complex due to the bus conflicts it has but not by very much.

UxROM Bank Switch

This was my first attempt at a patch for The Incident and it worked flawlessly. This story would have ended right here if it wasn’t for the fact that UxROM doesn’t have any form of non-volatile storage. Saving the game progression in NVRAM is very much something that I wanted to support and so had to continue to try other mappers.

MMC1 Patch, First Attempt

While the UxROM patch plays very well the mapper doesn’t have non-volatile storage so there’s no way to implement a replacement for GTROM’s flash saving capabilities. This set me on a new search to find another mapper which supported the same bank mapping scheme plus both CHR RAM and NVRAM. MMC1 (or SxROM) supports all of these things and it seemed to be the logical and obvious choice.

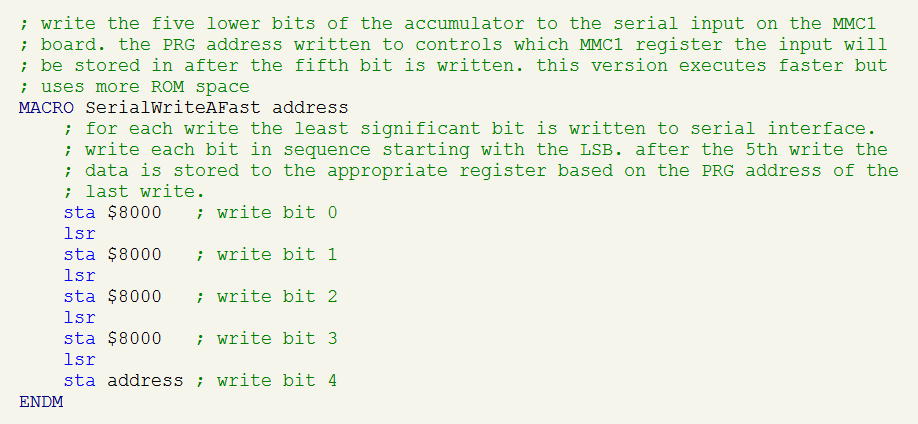
The patching process is basically the same as UxROM which is just to rewrite the two places in The Incident‘s code were it tells GTROM to switch pages to instead tell MMC1 to switch pages. Sounded easy enough but MMC1 throws an added complication since it uses a serial interface. What that means is that instead of writing a full byte to the mapper’s control register, like normal, only a single bit can be written at a time (apparently this saved on manufacturing costs back in the day). The practical implication is that the new code takes more instructions which use more ROM space and more CPU time to accomplish the same thing.

MMC1 Bank Switch Rev1

For my first attempt at writing this code I did what most programmers would probably do when faced with doing the same thing over and over again: I wrote a loop. I didn’t really pay any attention to the efficiency of the code or consider how long it would take to execute. The end result of my lack of attention to optimization was to introduce a timing bug which created a highly noticeable visual issue where the screen jumps around a lot during game play.

TheIncidentRev1

The reason this occurs is because the use of the PPUADDR register has a side effect of throwing off the scrolling offset when it is used which causes it to be at the wrong position at the start of the next frame. Normally, this would get reset by some writes to the PPUSCROLL register but these writes need to occur before the end of the VBLANK period. With all the added time to perform the bank switches this simply doesn’t happen fast enough and the effect is the incorrect scrolling that we see.

MMC4 Patch

Not understanding the reason why my MMC1 patch had this visual problem, I simply said “well, that didn’t work” and continued my search for another mapper that would. By this point the list of potential options is pretty well exhausted but MMC4 (or FxROM) at least looked promising. UxROM is exclusively CHR RAM based like GTROM and MMC1 games exist with CHR RAM or CHR ROM but no CHR RAM games exist for MMC4.

I assumed that this didn’t matter and that I could still just set 8 KB of CHR RAM in the iNES header for an MMC4 ROM and have it work as expected. However, the emulator didn’t like this at all and just gave me oddly garbled displays instead. This probably happens because the emulator actually needed to implement CHR RAM on the mapper separately from CHR ROM and the former was never done since no games ever used it.

IncidentTitleScreenMMC4.gif

My suspicion is that CHR RAM was never used with this mapper because it has an elaborate bank switching mechanism that allows it to switch banks in the middle of a frame. Making practical use of this feature required ROM back in day when RAM sizes were small and expensive. In any case, I strongly suspect this would work if a RAM chip were to be put on an actual MMC4 board.

MMC1 Patch, Second Attempt

Having completely failed at a MMC4 patch, I continued to look at other mappers but didn’t find anything else I thought would work. This lead me to back to reexamine why the MMC1 patch didn’t work correctly and I began to suspect that it was a timing issue. The direct cause of which is the significant increase in the total number of CPU cycles that must be used in order to switch the selected bank page.

For this second attempt I largely started over from scratch and this time focused on getting the number of instructions executed by the bank switch subroutine down to the absolute minimum. This was accomplished using assembler macros which generated separate instructions to handle each specific bit being written. This avoided looping logic and other overhead and executes in less time but actually consumes more space in the ROM due to mostly duplicate code.

SerialWriteFast

The rewrite did the trick and eliminated the issues in virtually all cases. It wasn’t until I had completely finished the development and was actually enjoying the patched version of the ROM that I noticed the one outstanding instance. It occurs during the stage completed screen but only in the case where a solution point is being awarded. Apparently, there’s just enough extra going on there to put us over the red line.

TheIncidentSolvedCompare

By this point I had moved on to other things so wasn’t keen on going back and revisiting it and so it remains in my final version of the patch to this day. At one point I considered diving back in and seeing if I could somehow optimize or adjust the game code to fix this but an easier solution would probably just be to try MMC4 again and just switch over to CHR ROM.

Making Space

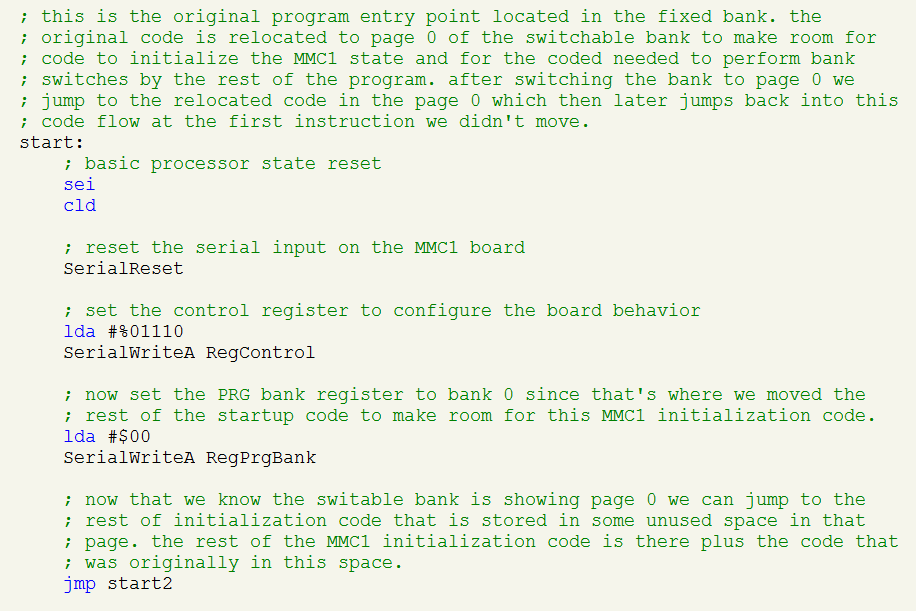
What I’ve glossed over up to this point is that, speed optimized or not, the new code needed by the MMC1 patch is a pretty large volume. The existing startup code used by the games and the bank switching subroutine also live in the fixed bank of the ROM which is limited to just 16 KB. For all the others there’s enough free space left unused by the game to fit the patch code directly into the fixed bank so it’s not terribly difficult to insert it. The Incident though has filled the fixed bank to the brim so there’s just not enough space left over.

To make space, I relocated a portion of the block of code that is executed by The Incident immediately upon power-on to a page in the swappable bank where there was a lot more unused space. My MMC1 startup code and bank switching code live in the space freed up by this. When the game starts it begins to execute my replacement startup code which does the necessary MMC1 initialization then switches to the page with the old startup code and jumps to it. The original code then runs from the new page and when it reaches the end of the relocated block there’s another jump back to the first instruction from the original code that wasn’t moved. Everything proceeds normally from there.

StartupCode

CHR ROM

One thing that I’ve tried to not change with all of these patches is the use of CHR RAM. All these games used it originally since that’s the only way that GTROM works. This is basically a “get it for free” situation because the procedure for loading data into CHR RAM is generally exactly the same regardless of the mapper used. GTROM complicates it only slightly by allowing one of two separate 8 KB pages to be selected and swapped between.

For The Incident, Spook-o-tron, and Scramble this seems perfect since they already do all the loading work and don’t make use of any page flipping. So, everything should and does work perfectly with UxROM or MMC1 without needing any modification. While this is great in theory it means that I’ve limited myself to only mappers that support CHR RAM and I’ve already documented my struggles with those specific mappers thus far.

In hindsight, I suspect greatly that a better solution might be to try other mappers, such as MMC4, that can more easily support PRG page flipping and NVRAM but require CHR ROM. This would involve creating a CHR ROM section in the ROM file and copying the character data from PRG while building the ROM file rather than at runtime. It might also require that I remove the code that does the RAM load (if it turned out to cause problems) but since none of these games do anything after the data is loaded it means that, in principle at least, CHR ROM would work just as well.

CHR RAM

Unlike the others, KHAN’s 4-in-1 Gamepak makes more significant use of CHR RAM. There’s at least one different set of CHR data per each of the games and so the information gets updated dynamically after selecting the game to play from the menu.

Additionally, Sneak ‘n Peak makes use of the page flipping feature. Since the metasprites for the player character are so large there isn’t enough space for the facing up, down, left, and right versions in a single page. So, Sneak ‘n Peak loads a different version in each page and flips between as needed when the player turns.

On GTROM, when Sneak ‘n Peak is first run the game selects the first CHR RAM page and loads the left and right sprites and then it immediately selects the second page and loads the up and down ones. From there is can instantly swap by just changing the page using the GTROM’s register.

SNPGTROM

On MMC1 there’s only a single page and I removed the code that handled setting the page but I didn’t otherwise modify the code for Sneak ‘n Peak. What happens is that it selects the page, loads the left and right graphics, then tries to set the second page, and then loads the up and down graphics. Since no page switching occurs the first upload just gets overwritten and we’re left with only the second version.

The practical impact of this is that the player simply can’t face left or right. When GTROM page flips, the facing right and facing down graphics are swapped so on MMC1 facing right is just facing down. The same thing happens for facing up and facing left.

SNPMMC1

It’s a purely visual issue and doesn’t otherwise interfere with the game in anyway. One way to fix this would be to find another mapper that supported pagable CHR RAM. Another option would be to switch to a mapper with pagable CHR ROM but that would require finding and copying all the CHR data into various CHR ROM pages and then finding and updating all the code which currently uploads CHR RAM and changing it to instead select the correct CHR ROM page. Certainly possible but I wasn’t motivated to fix this so I’ve left it as is.

Nametables

Another lucky development was that none of these games made use of GTROM’s four screen nametable mirroring. Spook-o-tron and the 4-in-1 Gamepak don’t use scrolling at all so it’s completely a non-issue. Scramble and The Incident do scroll but scroll only left-to-right meaning the target mapper must just support vertical mirroring to allow the screen to scroll horizontally.

If you don’t know, the NES has four screens worth of titles stacked into a 2×2 grid. A view the size of one screen can be set anywhere in this big square and can be moved around. Moving the view’s position over multiple frames causes different sections to be seen on the actual display and creates the scrolling effect.

Normally, the NES provides only enough RAM for 2 of these screens and so the other two are just copies of the first. The developer can choose whether the top and bottom or the left and right are “mirrors” (or copies) of one another and depending on which one is chosen the game can scroll up and down or left and right.

MMC1 Nametable

GTROM on the other hand adds extra RAM right on the cartridge so all four screens have their own set of data and can be filled with tiles independently of the other two. This kind of configuration would make fluid scrolling in any of the 8 possible directions possible but since none of these games needed that it wasn’t something I needed to worry about. I just set all of them to use vertical mirroring for horizontal scrolling in the ROM header. Had any of them used this feature it would have complicated things since I would have needed to use a mapper with memory for all four screens. This is less common and none of the three mappers I’ve tried so far support it.

GTROM Nametable

Saved Games

In the heyday of the NES, games with “save” features that stored data when the console was off used a battery-backed RAM chip to accomplish this. Other solutions, like the flash memory saving used by GTROM, either hadn’t been invented yet or were simply cost prohibitive 30 years ago. Today, emulators support this by simply saving the information in a file (usually .sav) when the emulator is closed.

All four of these games use the flash saving feature in some capacity whether it’s for saving progression or just the high-score list. Since the method of saving is completely different the GTROM saving doesn’t work on any classic mapper. Loading works because the saved data is read like any other PRG data but it’s read-only and so reverts as soon as the emulator is restarted.

Fortunately, implementing NVRAM saving is really easy. All it requires is a mapper that has some NVRAM and the procedure is literally just to read and write it just like the NES’ built-in RAM. All these games saved data in GTROM by just copying a 256-byte block of memory from RAM to the flash chip. When the game was restarted it was just read from PRG directly back into RAM. This code is easily replaced with code which just copies between the console’s RAM and the cartridge’s RAM.

SaveNVRAM.png

When the emulator starts a game with NVRAM but has no save file to read from it just initializes the save RAM to all zero bytes. The Incident and the 4-in-1 pak were happy to start from a blank save so I did nothing special other than to just copy the data in both directions.

Scramble on the other hand assumes that the first time it is run the default high score list is already saved. So, if I leave it blank then there’s no highscore list and it breaks. To fix this I used what most old games did which was to store a checksum for the data in the save and verify it upon loading. If it matches then we use the saved data. Otherwise the data is assumed to be uninitialized or corrupted and a separate subroutine is called to generate the default highscore list instead.

LoadNVRAM

Build Script

I use ASM6 to assemble all my patch code into a small binary file. Then the next step is to copy each new block of code from a section of this file to the appropriate location in the ROM file while overwriting the old code. My original approach was to perform this second step manually by copying each block one-by-one using a hex editor. The procedure is recorded in the source file simply using comments. This approach works but its tedious, error prone, and requires a lot of repeated work as the patch changes.

PatchSteps

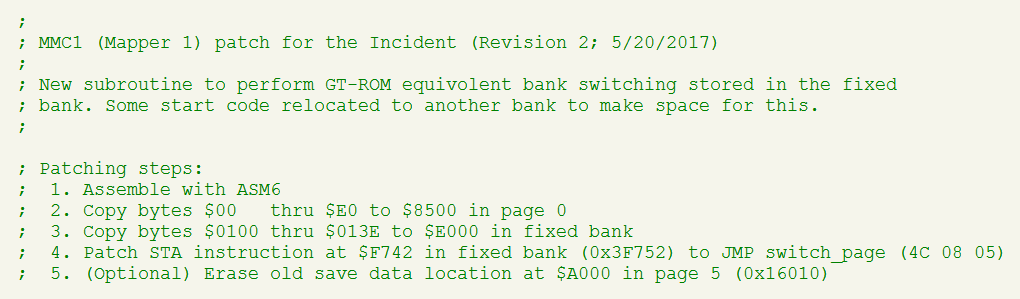
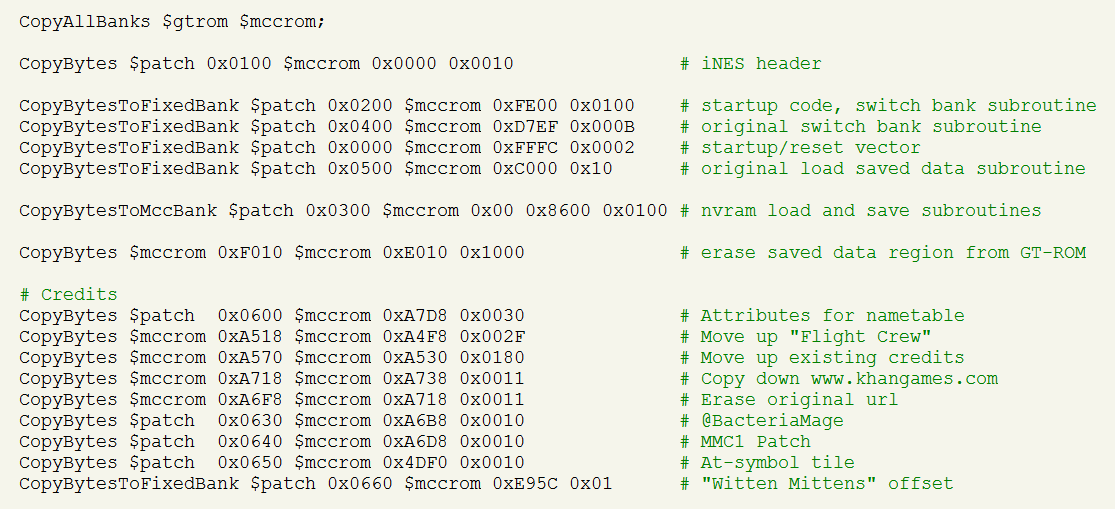
In later patches I replaced this with a script that always started from a clean and unmodified copy of the GTROM dump. The script first copies all fixed and non-fixed pages from their original positions in the GTROM file to the new corresponding locations in the output file. Then it runs ASM6 to build the patch code from source and finally copies each block of patched code and data from the assembly output to the ROM. This creates a single build procedure that can be easily tweaked, is repeatable, and more clearly documents the steps of the entire patching process.

PatchScript.png

Conclusion

It was quite an adventure, a lot of work, a lot of fun, and a lot to learn to actually get these patches working. While I don’t feel like I can share the patches at this time I really wanted to at least share the experience with this article which was also quite a bit of work to put together. I hope you found that it flowed pretty easily since I tried to keep the sections manageable, break it up, and keep it interesting with lots of illustrations. If you managed to read this far then you have my external gratitude. Cheers!

Unboxing: Kirby’s Adventure

Kirby's Adventure

If you are one of those folks who like to collect factory-sealed items and keep them sealed then you are going to want to avert your eyes on this one. To-each-his-own, of course, but this is a particular obsession that I do not share. I collect games to play them and also to admire them as a complete piece including the manual, inserts as well as the packaging and the physical media; this requires opening the box.

But What If Something’s Missing?

Mind you, I have no problem with second-hand CiB copies but the thing that always irks me about buying an open box is a little nagging voice asking if everything that is supposed to be there really is there. This is not an issue of mistrust; I can assume the good faith of the seller. It’s simply that if you are not the original owner then how are you sure nothing was lost or removed along the way? Even for original owners, how can you be sure about something you’ve been holding for, in some cases, thirty years?

So, I always jump at the opportunity to get a new-old game still in the packaging because all of this uncertainty melts away and I know everything that’s supposed to be there is there. There’s also something incredibly satisfying about the anticipation of tearing open a brand new game for the first time just like when I a kid.

An Incomplete Collection

I’ve always considered myself a fan of the Kirby series but for a long time never owned or really properly played any title (my first copy was Kirby Super Star on the SNES). I think the issue with Kirby’s Adventure might have been that it was released very late in the licensed area for the NES and I had simply moved my focus to SNES at that point. No matter the reason, now that I’m much older and wiser I have been looking to fill out my classic NES collection with some missing gems.

Opening The Box

Recently, a factory sealed copy of Kirby’s Adventure had the good fortune (?) to find its way into my possession and I don’t think there is much else I need to explain about my intention to open the box or why. But, I do want to share the experience as much as it can be. I also want to document the knowledge of what was really in that box both for posterity and to help out anyone else who might not be lucky enough to find a sealed copy and is left wondering what, if anything, their opened copy might be missing.

Without further ado:

Kirby Box Collage

Kirby’s Adventure was released in North America in May of 1993 so this box has been sealed for over a quarter of a century at this point. I feel like it’s something of a time capsule by now and the time has come for it to reveal its secrets:

Kirby Opened Box

Something that I really miss is the crisp, distinctive smell that new boxed games and software always had back in the day. I think it was probably from the printed materials but I’ve found that even items that have been sealed have all lost this quality after twenty or more years. Some items, even in otherwise good condition take on a musty smell but at least this Kirby here has avoided that. It might be due to how it was stored.

Everything inside the box is, as expected, in pristine condition:

Kirby Box Contents

As you can see, the complete set of inserts includes not just the instruction manual but also a poster, a safety information booklet, and a Nintendo Power subscription form. All pretty standard fare for the time by my recollection. It’s really funny how the ancillary paper inserts really round out the collection if you are collector and completionist when no one paid them a second thought or might have even found them to be an annoyance back then. (All those PC game registration cards I sent in! What was I thinking!?)

It’s interesting to me that the cartridge itself is wrapped in plastic within the sealed box. This isn’t something that I remember seeing in the past. It’s possible it’s just me or that this is more unusual (perhaps because Kirby is a latter NES title?). The foam brick to fill the extra space in the box is common and begs the question why Nintendo just didn’t make the standard box size smaller?

The box and manual front and back are pretty easy to see online since they were commonly preserved but here are some close-ups just the same:

Kirby Box and Manual

The Nintendo Power subscription card really is blast for from the past. Nostalgia overload right here:

Nintendo Power Order Form

All this power for just $15!? Why, I’d be a sucker not to take it! But seriously, it’s incredible how much I like having one of these simple ads again just for the historical context. They were a dime-a-dozen back in the day and I subscribed to Nintendo Power for years but I didn’t manage to keep even one despite the stacks of manuals I did hold on to all these years. You’d have never thought twice about it then but now that it is completely useless it suddenly seems to have intrinsic value.

The poster is also a commonly seen insert:

Nintendo Power Poster

This is pretty generic and there were many different ones produced; just a simple and cheap promotional item inserted with most games. I do have a bunch of these mixed in with my old manuals collection. There’s nothing about this poster that ties it back to the specific game. It could have been (and probably was) just included with any old game and if you found one now loose in your closet you’d be hard pressed to match it back to the game it came with. Short of finding a lot more sealed Kirby copies and opening them, there’s no good way to know if the same or different poster was inserted with each copy on the same production run.

A Rare Find?

If we look closer at the box we can see that this is a “Rev-A” copy of the game:

Kirby Rev-A

Now, I am no expert on this and I don’t pretend to be. But, when I purchased this the eBay listing made a big deal about how this was the “rare Rev-A” copy of the game. While there are two known variants of the ROM, my understanding is that the Rev-A on the box actually refers to the packaging itself. As far as I can tell a Rev-B never existed meaning you can and do find both versions of the ROM within boxes marked Rev-A.

The ROM dump of this particular cartridge (performed with an INL Kazzo via anago_wx) is identified by GoodNES as the PRG0 revision. The Cutting Room Floor also calls this PRG0 (as identified by the string at 0x7FFF0) and claims it is the earlier revision. I also computed the CRC32 for PRG as 0x9077A623 which matches profile 2 in BootGod’s database. Interestingly, profile 1 is marked as “Revision A” in the database caption but GoodNES identifies the ROM with the corresponding CRC32 value (0x8FFF3F32) as PRG1 (which it must be based upon simple elimination).

This is all somewhat muddled but based upon the chip time-codes in the database for PRG0 (9314) and PRG1 (9334) it does seem like the chips containing PRG0 were produced earlier and therefore must be the earlier revision. So, if the Rev-A on the box did indeed refer to the ROM revision then this would make sense but it doesn’t actually prove the connection nor does it actually establish that the variant is rarer as the listing claimed.

I really can’t tell whether PRG0 or PRG1 is more common based on any of this. For what it’s worth there are 3 additional profiles in the BootGod database matching the PRG0 checksum which would seem to suggest a wider proliferation of cartridges with that revision but it’s really circumstantial to think that. In any case, rare or not, it’s still a gorgeous copy of a great game and I’m happy to add it to my collection:

Kirby Plastic Case

World Map for The Mad Wizard

Mad Wizard Small Map

Back in January, I played all the way through The Mad Wizard by Sly Dog Studios after hearing about it on The Assembly Line podcast. I had already ordered the cartridge by the time Kevin and Beau mentioned it was free to download; not that it made a difference since I’m always happy to support hardworking homebrewers. I did start playing on the cartridge but switched over to the emulator pretty quickly when it became apparent it would be really easy and helpful to assemble screenshots of each of the 128 rooms into a complete world map of the entire game. I ended up doing just that and thought it would be good to share it with everyone else by posting it on GameFaqs.com.

I submitted the map expecting it to be quickly accepted (I even had a post for this blog pre-prepared) only to find that it was rejected. Turns out that GameFaqs, as a matter of policy, doesn’t accept any maps which are purely collections of screenshots. They refer to this as “unannotated” and it was the reason I was rejected. Fair enough, but I’ve only now gotten around to adding some annotations to the map and resubmitting it. I’m happy to say that GameFaqs has now accepted my submission and you can find it on The Mad Wizard page on the GameFaqs website.

https://gamefaqs.gamespot.com/nes/158356-the-mad-wizard-a-candelabra-chronicle/faqs/76030

I have to say that the initial rejection kind of sent me into a fury but not because I was mad at being rejected. Their contributor portal doesn’t have the clearest interface and the rejection message was just the single word “unannotated.” I took this to mean that the rejection itself was unannotated; which is to say that they didn’t even bother to explain why. When I eventually realized that this was the explanation my rage subsided but I didn’t really agree with their reasoning on it.

I disagreed because I felt like the map was self-apparent because you could see everything that mattered like bosses and power-ups right in the screenshots. However, now that I’ve actually added the annotations I really do see their point in how this helps make the map much more useful. Mostly this is because in order to actually annotate the map I had to play through again to figure out what all the different scrolls were so clearly things aren’t as completely self-apparent as I thought.

All that being said though, the reason I really didn’t want to annotate the map was because the world map for this game is just gorgeous and the annotations get in the way of trying to appreciate the aesthetics of it. You just don’t truly get a sense of how well-crafted the entire world is when you only take it in screen-by-screen from within the game. It’s truly a work of art that must be seen at the macro level to fully appreciate it which I hope is apparent from the scaled down version at the head of this post.

I’m grateful for the added visibility that hosting the annotated map on GameFaqs provides and I’m happy to meet their editorial standards as well. But, I do think it’s a mistake, in this case at least, to assume that the unannotated map has no value and isn’t worthy of their gallery. It is, indeed, less functional (I guess functional is really the whole point of GameFaqs though) but the cost is the loss of some of the intrinsic beauty of the whole. So, in addition to the annotated map, I’ve also posted two unannotated versions—with and without grid lines—to my Neocities page. I encourage you to take look; they are a sight to behold.

https://bacteriamage.neocities.org/games/the_mad_wizard/index.html

Twin Dragons Password Encoder/Decoder

td_password

It’s been a little while since I last posted anything because I’ve been occupied with some other things that I wouldn’t blog about and that’s going to continue for a while longer. But, Twin Dragons came in the mail the other day and it provided a nice excuse for a little diversion. So, funny story: a fresh and incredibly polished new title shows up on my doorstep that just screams “play me! play me!” and what do I do instead? That’s right, I disassemble it because my twisted psyche demands nothing less.

In all seriousness though, I have played the first couple of levels through and really enjoyed it so far. It’s a great game that deserves to be played and I intend to continue doing just that. That said, when I saw that it had an algorithmic password system I just couldn’t help myself and had to dig in and tear it apart right away. Long story short is that I ended up creating a little JavaScript app to edit the passwords which is probably what you are looking for if you’re reading this. You’ll find it on my Neocities page which is linked below (doesn’t seem like there is a way I could host it on this WordPress blog).

https://bacteriamage.neocities.org/twin-dragons-password-encoder-decoder.html

The rest of this post is just my usual commentary discussing some of the more interesting tidbits around this topic. Before we jump into that though, I just want to say that I’m a little worried that someone will think that I’m trying to denigrate or take something away from Twin Dragons by putting this password generator out there. Nothing could be farther from the truth; I admire and respect what Antoine and everyone at Broke Studio has accomplished with this title and it is worth my effort tearing it down because of how brilliant it is. The password generator is something I did on my own for my own purposes and I put it out there just because I think it might be of use or interest to some others and because of my belief that players always have the right to decide how they play a game.

My last post on the topic of game passwords took a really deep dive into the specifics of the system used by The Legends of Owlia. This time I’m hoping to keep the discussion much higher level and just touch on a few key points that I think are really interesting and noteworthy about Twin Dragons. Of course, I’m known to have a problem with brevity so, let’s just push ahead and we’ll see what I end up churning out. Also, I guess I owe Derek over at Gradual Games an apology for not giving Owlia the full-on password-generator treatment. I’d like to but Owlia‘s underlying data format has more complexity and so creating an editor form would require a much larger effort.

Encoding

At first glance the password encoding in Twin Dragons doesn’t seem particularly out of the ordinary. There’s a four-by-eight grid of characters so that’s 32 of them meaning each one gives precisely 5 bits of data. There’s eight characters in each password so we’ve got 40 bits or exactly 5 bytes of data; how very tidy. The characters in the matrix are just assigned numeric values from left-to-right and then top-to-bottom so the value of each character is easy to predict even without any reverse engineering.

What I found next though kind of blew me away since it’s not something I’ve seen in any game password system that I’ve investigate so far (both classic games and recent homebrew). Generally, I’ve always seen games use somekind of simple bitmask and exclusive-OR to scramble the raw data and create an appearance of randomness. But, Twin Dragons kicks this well into overdrive and uses a complex combination of shifts, bitmasks, and arithmetic to scramble the bits and it’s all interwoven between the different bytes of the raw data values. Here’s some C-style code for the basic algorithm:

p0 = (((p1 << 3) + 0x0e) ^ p0) & 0xff;
p1 = (p1 - ((p2 << 3) ^ 0xf9) - 1) & 0xff;
p2 = (((p3 << 3) + 0x13) ^ p2) & 0xff;
p3 = (p3 - ((p4 << 3) ^ 0xad) - 1) & 0xff;
p4 = (((p0 << 3) + 0x23) ^ p4) & 0xff;

What’s really hardcore about this though is that this isn’t just run through one time; it’s actually applied repeatedly for 16 rounds. This generates a remarkable amount of apparent entropy and raw values that differ by just single bit end up yielding wildly different and unpredictable results. This is the kind of behavior you’d expect to see from a real cryptographic cipher which, in my personal experience, is beyond unusual and really impressive for a game’s password system.

I’ve yet to try my own hand at the whole homebrew thing but I’ve always known that I’d want to include my own algorithmic passwords and how that would work I’ve thought a lot about. Up to now I thought I had the perfect system worked out but these fine chaps at Broke Studio have really one-upped my thinking here and given an entirely new perspective to consider. Kudos.

Validation

In some detail, I discussed in my Owlia write-up how games typically compute and embed a checksum within the password to validate it when it’s later entered by the player. The purpose is so the game can tell the difference between a real password generated by the game and one where the player just randomly punched in values. This also catches simple transcription mistakes which would otherwise produce garbled data. Twin Dragons‘ system includes such a validation mechanism so that it can reject any bad passwords but once again it takes a surprising approach.

Rather than a checksum, Twin Dragons just dedicates a single byte of the raw data to a fixed and predetermined value (0x3F in this case). The one value is written to every password before its encoded and so is expected to be present once the same password is decoded. If the value matches after being decoded then it’s a valid password and otherwise it’s not. This is somewhat akin to the concept of a “magic number” sometimes used to identify different types of binary file formats.

With other games, I think the variability of the checksum helps to increase the apparent randomness of the total password. Using such a fixed value could potentially standout and create obvious consistencies between different passwords. I think Twin Dragons can get away with the fixed value because of the elaborate cipher it uses which just erases any trace of the static value embedded in the raw data.

Stages

As expected, the password contains the next stage of the game to play. The passwords are issued on the world map which only appears after bosses between completely different areas of the game. So, we’d probably also expect that the password would just contain what the next area is. A single byte contains a counter for the number of the next stage but this value is more granular than just the broader areas. Each of the individual stages that compose the areas have their own identifier as do bosses and other things like animated cut scenes. While I don’t think the game will ever issue a password with a more specific value, it does happily accept these additional values if you encode a password to contain them.

This allows custom passwords to be created that go directly to specific portions of the game. This also includes the game’s ending and credits. I can only guess as to why the game has this otherwise inaccessible capability. My best guesses are that at an earlier stage of development there were plans to allow more granular passwords that were later abandoned or that the specific passwords were included to make it easy to jump to specific places during development and play testing.

Unused stages

The game uses a full byte value to store the stage number which is 256 possible values but only 25% of those values are actually used. All of the other unused values seem to just send you back to the main menu if you put them in the password. However, I only own the standard edition gray cartridge and it is my understanding from the Kickstarter campaign that there are also special green and pink versions which each contain an additional area or stage for Dinky or Minky, respectively.

Lacking access to either special edition I don’t know how they work but I’d guess that those versions might use some of the unused values for those other stages. That would mean that if you used those special stage passwords on another color cartridge it would probably just send you back to the main menu. Other possibilities are that the special stages aren’t accessible through a password or that the alternate versions encode the passwords using a different algorithm and so the passwords aren’t interchangeable between them at all.

Anyway, if you have a special edition cartridge and obtain a password for one of the exclusive stages I’d be interested to see it if you wanted to send it to me. Alternately, you could try encoding some passwords with some of the unused values and see if they have any different effect on other versions of the game. I haven’t tried nearly all of the other values but I’d suspect the ones for the special stages would be in the 0x40 to 0x50 range right after all the other currently used values.

Invulnerability flag

dinky_spikes

On the topic of interesting secrets embedded in the passwords is Twin Dragon’s invulnerability flag. Simply put, there is a single-bit flag within the password that if set causes Dinky (or Minky) to be invulnerable to enemies, spikes, projectiles, etc. The only things that are still fatal with this flag set are environmental hazards like water, lava, or falling off a cliff. The game always clears this flag before encoding a password so even if you have it set while playing any subsequent passwords issued do not contain it; the only way to set it seems to be to create a password yourself that has it set.

Again, I can only guess as to why something like this exists in the password. It’s really interesting that it’s there but it definitely isn’t used by the game under normal circumstances. It’s possible that it was intended for debug uses. It’s possible that it’s part of some kind of internal cheat code and the flag just happened to be stored in RAM in with other stuff that normally goes in the password and was never intended to actually be set in the password. It’s also possible it’s an Easter Egg inserted for password hackers to discover.

Other Observations

When you start a new game you select the level of difficulty and this gets encoded in the password so you continue that same level when you resume playing with a password later. There are 3 possible difficultly levels stored in the password using 2 bits which leaves an extra unused value. The game crashes if you set the difficulty level to unused value.

The password dedicates a full byte each to the number of lives and the number of peppers. This means each one has possible values starting with 0 and going all the way to 255. The number of each is capped at 99 as is usual for most games. The minimum number of peppers is zero and the minimum number of lives is 3. You can encode passwords that contain other values but they just get rounded up or down to the respective minimum or maximum value when the password is decoded. To simplify things, I made the password app follow the same rules but you could easily remove the validation by editing the JavaScript if you wanted to use it to encode numbers outside the usual ranges.

There’s a flag which keeps track of whether the player character is Minky or Dinky. This is mostly ignored by the game since the level will use whatever character is normally used with the specific stage. But, for the last couple of levels where you can freely switch between characters this field will affect the player that you start with.

The lower 2 bits of the upper nibble of the flags byte appear to be unused. I believe they are always zero under normal circumstances and if I set them it appears they have no effect. This isn’t terribly surprising since most passwords do contain some unused slack space like this. I did include the flags in the password editor though so if you ever see them set in a real password or set them yourself then notice some effect let me know since I’d like to investigate further.

Game Genie codes for Spook-o-tron

Spook-o-tron copies have been shipping out this month after the successful Kickstarter campaign last spring. I recently received my copy of the backer-edition cartridge and, as expected, the difficulty is pretty brutal. Given that and that there are probably many active players at the moment, it seemed like the perfect time for a follow-up to my previous Game Genie codes for The Incident post with (wait for it) Game Genie codes for Spook-o-tron!

Spook-o-tron Title Screen

As always, this post will get right to the codes so you’ll find them in the table below and I feel like this is a pretty good set. This time around I’m opting not to describe how each code works in detail like I did previously for The Incident. My thinking right now is that I want to get these out while they’re still fresh and I just invested allot of time in The Incident post so it’s hard to do another really long one right now. However, if you’re interested then shoot me a tweet on Twitter (where else would you do it?) and maybe I’ll do a followup describing the details.

The Codes!

Just some quick notes on these codes. I created them from my backer edition copy of the cartridge. All I can say with certainty is that they seem to work for me with my copy. As usual, my standard disclaimer applies, and I can’t be sure they’ll work for your or that they’re even safe to try. I assume everyone else with a backer edition copy probably has an identical ROM so they should work for those copies too.

If you have one of the higher tier copies then they might work–or not. It would really depend on if the numbered edition copies moved things around on the ROM image. The differences might be superficial as far as the program layout goes or it might not be. There’s no way for me to know without examining a numbered cartridge which I don’t own. The same goes for any eventual standard releases that might come out post-kickstarter–they might be the same and the code might work or they might not work.

Standard disclaimer: I provide these codes with the hope they are useful but I make no warranty to their usefulness, fitness for any purpose, or safety. You assume all risk associated with their use including but not limited to liability for any and all damages.

SXETYVVK Infinite Lives (they never decrement)
VOOGGSNO
VOOKGSNO
VOKKZSNO
Earn lives 10x faster
EXOGGSNP
EXOKGSNP
EXKKZSNP
Earn lives 10x slower
OXOKPIES Never earn any lives
PEKIGYLA Start with 1 life
ZEKIGYLA Start with 2 lives
GEKIGYLA Start with 4 lives
OXKKVLES Kill 1 enemy to win level
SZNTAIAX Enemies don’t move
AUKNSTAY Turn both cartridge LED lights on
EUKNSTAY Turn red cartridge LED light on
ENKNSTAY Turn both cartridge LED lights off

Obviously, some of the codes would conflict and shouldn’t be used in combination like the speed of extra-life earning or the number of starting lives.

Most of these codes make the game easier but a couple could be used to make it harder if somehow you are looking for an ever greater challenge. I agree with Brad Smith when he said that once the game is in your possession how you play it is really up to you–what the developer originally set is just a suggestion.

Cutting Room Floor

A single Game Genie code is just an instruction to change a single byte in the game’s ROM. You are essentially writing a patch or hack but you are limited by the number of individual codes the device allows you to enter and the number a user is actually going to be willing to transcribe. So, while in principle it’s possible to pretty much do anything, in practice we’re limited with what we can actually do with a code to only what can be accomplished using simple changes. That said, there’s a couple of codes that I tried to create but wasn’t able to.

First, I really wanted to make an invincibility code. I actually wrote one and it worked but it had a fatal flaw. If you don’t die when the enemies reach you then they tend to bunch up all in one spot. It seems that there is a bug (that otherwise probably can’t manifest) with the game where it locks up if too many bunch up in one spot (seems like a big issue for ghosts). It’s probably possible to fix this bug but probably not with just one or two codes so invincibility just won’t work.

Second, I wanted to find away to just make all the enemies die instantly so you’d get the points and go to the next level. This doesn’t work since we don’t even get close to this code until the blaster shots are checked for collision. An alternate would be to short circuit the collision so that a fire shot immediately kills an enemy without getting anywhere near it. This could have worked but the game checks collision in multiple places so there’d be too many bytes to change to make it all work.

Lastly, I tried to create a code where touching the player would cause the enemy to die instead of the player. This would have been really cool and given pretty much the same effect as I was looking for with the instant death code. This was a long shot and it didn’t work. The idea here was just to replace the code at the start of the kill-the-player subroutine to jump into the subroutine to kill an enemy after a bullet hit. I expected it would just crash but actually it just gave an invincibility effect but didn’t kill the enemy (it still suffered from the same invincibility crash issue I described earlier). I didn’t spend allot of time trying to understand why it didn’t work but the two pieces of code are in different parts of the program so it’s probably related to them expecting different parameters.

Game Genie codes for The Incident

It didn’t take long after I first became interested in NES homebrew to notice that there were basically no Game Genie codes available for any of the homebrew titles. That just seems wrong to me; why no cheat code love for the homebrewers? So, I’m taking it upon myself to help fill this void and I’m hoping this post will be the first in an occasional series each devoted to a new game.

One of the very first homebrew titles I played was The Incident by KHAN Games and it was actually this game which first made me think about wanting some homebrew cheat codes. Seems like the logical place to start and so without further ado here are some Game Genie codes for The Incident. The remainder of this post will just discuss the codes in detail and explain more about how they were created and how they work.

Standard disclaimer: I provide these codes with the hope they are useful but I make no warranty to their usefulness, fitness for any purpose, or safety. You assume all risk associated with their use including but not limited to liability for any and all damages.

SXNSYXVK
OXXONIEN
Purchase solutions for free
PAVNELAA Auto-play from next puzzle to end of floor
SZOGXTEY
SZNYKPEY
Purchased solutions still give credit for solving
XZKUUIEI
OXVTVYES
Enable sound test
EYKYPYAY Turn off both LEDs
ALKYPYAY Turn on both LEDs
ELKYPYAY Turn on the red LED only
SZUVPAAX Skip loading saved data

I don’t currently have functioning vintage hardware so these codes have been created and tested using an emulator and a RetroUSB AVS system. I believe they’d work with an original Game Genies and NES but have no means to test them at present.

Purchase solutions for free

I think this is the most obvious code for The Incident which allows you to “purchase” the solution for the current puzzle without spending any solution points. Solution purchasing is a built-in feature where you are awarded one point for every three puzzles you solve manually that you can spend to see a pre-recorded solution played back without having to solve it yourself. The codes SXNSYXVK and OXXONIEN allow you to do that without actually spending a point.

There’s two codes for this since there’s actually two operations involved with spending the point. The first is to check that you actually have at least one point to spend and so the code OXXONIEN suppresses this check. The number of solution points the player has is stored at $00A5 in RAM and when the player attempts to spend the point the following instructions execute to check that the value isn’t zero. The BEQ instruction jumps around the code immediately after it if the value is zero which is what skips starting the auto-play if you don’t have any points.

9DAA LDA $00A5
9DAD CMP #$00
9DAF BEQ $9DC1
9DB1 LDA #$01
...
9DC1 RTS

The cheat code changes the byte at $9DAF from $F0 for the BEQ instruction to $A9 for the LDA instruction (immediate mode). This prevents the jump regardless of the value so that the code to start the auto-solution playing always executes. The side effect is that the accumulator register gets set to $10 which was the offset being used by the BEQ instruction to jump down to $9DC1. This doesn’t matter since the next instruction is another LDA so the value is immediately valid again.

9DAF LDA #$10
9DB1 LDA #$01

The SXNSYXVK code suppresses the actual subtraction from the number of solution points owned. A single instruction at $D2FF accomplishes this by directly decrementing the RAM address using a DEC instruction:

D2FF DEC $00A5
D302 RTS

The cheat code replaces the $CE byte for the DEC instruction with $AD which also transforms it into a LDA instruction. This stops the decrement but has the side effect of setting the accumulator register to the number of solution points. This is not a problem since the subroutine exits immediately afterward and the caller doesn’t expect any particular value in the accumulator.

D2FF LDA $00A5
D302 RTS

You’ll always want the decrement cheat code since that actually prevents the solution count from being altered. The first code which skips the check is only necessary if the available points count is actually zero since the check it skips is satisfied anyway in any other case. If you suppress the check but not the decrement and have zero points then the 8-bit value wraps around and you end up with 255 points. This also works but is way more than you ever should be able to get and it doesn’t display correctly in the menu. It would also wrap around to again to zero if you happened to earn another point.

Auto-play from next puzzle to end of floor

This one is a little kludgy, I think, but its very important if your goal is to get The Incident to play itself. What this cheat code does is engage the same auto-play mode used by the game when you purchase a solution so that each puzzle just solves itself in continuous succession all the way to the end of the floor. The catch is that it doesn’t engage until you complete the initial or current puzzle so you have to either solve the first one manually or purchase the solution from the menu.

There’s a function located at $FB29 which is called every frame but just quits without doing anything except at the end of a level transition animation. This function does various things but one of those things is to clear the RAM byte stored at $007A which is the flag that indicates that a solution is being auto-played. This flag gets set when you select purchase-solution from the menu and then it stays set all through the auto-solving until this function clears it.

The clearing of this flag is the only thing that prevents the auto-play from continuing on the next level so if this doesn’t happen then the next level starts playing itself automatically as soon as it starts just the same as if you had selected it from the menu. That’s why these two instructions near the end of the function clear the flag after each puzzle is completed:

FB67 LDA #$00
FB69 STA $007A

Together the two instructions clear the accumulator register and then write that cleared value to the flag address in RAM to clear it out as well. The PAVNELAA code changes the value set into accumulator to one instead of zero so that the next instruction always turns the flag on instead of off which is why it causes all the remaining puzzles to solve themselves regardless if the flag was on or off before.

FB67 LDA #$01

If you are using this code then you must want the levels to auto-play so the fact that this unconditionally sets the flag is no big deal. However, this kind of rubs me the wrong way which is why I called it kludgy. The code I wanted to create was one that just left the flag alone so that it stayed turned off if it was off or stayed turned on if it was on. This means you’d actually have to start the auto-playing going by selecting it from the menu before it would auto-play the current and all subsequent puzzles on the floor.

The reason I didn’t make the code work that way is because there’s no way to accomplish that using only a single code and it seemed better to a have a little wonkiness than to require a whole extra code be entered and have an additional code slot be consumed. The reason for this is because the function actually clears the flag in two different places:

FB32 STA $007A
...
FB69 STA $007A

We could neuter the store instructions by changing them to something else so they don’t write the value like we did with the purchase-for-free code to get this effect but since there are two writes we’d have to do it twice which means two codes. I don’t know why the game does this twice but my best guess was just that it was done on accident since clearing it twice doesn’t have any added effect that the first write wouldn’t have already. The double clear is also the reason the PAVNELAA code attacks the second write since if we did the first one then the second one would just clear it and there’d be no net effect. Anyway, if you want the codes to just nullify the two writes they are ILUYXUSE and ILVNOUSE.

Purchased solutions still give credit for solving

These two codes are kind of my favorite since when used in combination with the codes from the previous sections it basically can be used to get the game to play itself all the way through and reach a “perfect game” end state. The same as if you actually played the game all the way through without ever purchasing a solution (assuming you start from freshly erased saved data). This is a god-send for those of us (me!) who are too stupid and/or lazy to accomplish this feat on our own.

At $CE0D there’s a function that awards credit for solving the puzzle that is called after a puzzle is completed and advancing to the next puzzle on the same floor. There’s a similar block of code starting at $F96F which does the same job when it’s the last puzzle on the floor being solved. In both cases the first thing the code does is check the $007A flag discussed earlier which is set if a solution is being auto-played and just skips to the end if it was set so that the player doesn’t get any credit.

CE0D LDA $007A
CE10 CMP #$01
CE12 BEQ $CE3E
...
CE3E RTS

F96F LDA $007A
F972 CMP #$01
F974 BEQ $F998
...
F998 ...

We want both of these blocks to always execute regardless of the state of the flag so that we get credit even if we didn’t actually solve the puzzle manually. Like with the check for zero solution points we can just convert the branch instructions into a load accumulator instruction so that the code always falls through. This has the same side effect of affecting the accumulator value but again it doesn’t matter since subsequent code resets it before the register is used again.

CE12 LDA $002A

F974 LDA $0022

It’s unfortunate we have to do this twice and use two codes but since the game does it in two different places we can’t avoid it; otherwise we wouldn’t get credit for “solving” every stage. I think the reason the game duplicates the logic is because its part of the level-completed animation which is different for the end of floor so it has to happen in this second place in the program also. Alternatively, it might have been possible for the second block to just JSR the first function but that’s just not how it’s coded.

Enable sound test

After completing all 120 puzzles a sound test option appears in the menu on the title screen I guess as a kind of prize for beating the game. The codes XZKUUIEI and OXVTVYES will enable this option without actually completing the game first. The first code causes the menu option text to appear where as the second actually allows it to be selected. If only one of the codes is used then the option can be seen but not used or (more interestingly) can be used but not seen. This requires two codes because the two separate operations each perform the is-the-game-completed check independently on their own.

After finishing the last stage the flag at $00EB is set in RAM. I’m not sure if this value is used just for the sound test or if it also controls something else but this is the variable that gets checked for the sound test option. For the display code, there’s a function at $BD46 which is responsible for actually drawing the menu option text. The first thing it does is check the flag then jumps to the end if its not set.

BD46 LDA $00EB
BD49 CMP #$01
BD4B BNE $BD67
BD4D LDX #$00
...
BD67 RTS

Just as before, we can change the branch instruction into a load and then the code always falls through and paints the text even if the flag isn’t set. The side effect of setting the accumulator register doesn’t matter since the next instruction resets it to something else.

BD4B LDX #$1A
BD4D LDX #$00

For the selection cheat code, there’s a set of instructions starting at $EFE1 which decides whether you can select the sound test option in a long block that executes each time you press select on the title screen. Again, this code just tries to jump down if the flag isn’t set.

EFE1 LDA $00EB
EFE4 CMP #$01
EFE6 BNE $EFF5
EFE8 LDA $004A
...
EFF5 ...

So, we convert the instruction in the same way. There’s no side effect since the next instruction resets the accumulator. Yawn.

EFE6 LDA #$0D
EFE8 LDA $004A

Manipulate the cartridge LEDs

The Incident cartridge uses a GTROM circuit board and mapper. This particular board includes two LED lights, one red and one green, which can be switched on and off by the game at pretty much any time. This was probably intended more as a debugging or diagnostic tool for developers but it could also conceivably be used by a game as some kind of indicator to the player. The Incident chooses to just leave the green LED turned on and the red LED turned off pretty much all the time except for brief periods when saved data is being updated on the cartridge (which is so quick that it’s pretty imperceptible).

Since a single piece of code controls this we can manipulate it to turn either light on or off to suit our preferences (just because we can). The GTROM board contains a single register located at $5000 to control bank switching and the control bits for the LED are combined into this register. The Incident uses a single function located at $F73F to update the register for bank switching and it also contains the logic for controlling the LEDs.

F73F TAX
F740 ORA #$70
F742 STA $5000
F745 RTS

The lower nybble (4 bits) of the GTROM register select the page for bank switching. The left-most (most significant) bit controls the green LED and then the next one to the right controls the red one. The remaining two serve other purposes that aren’t important here. The function expects the caller to set the desired page in the lower nybble of the X register which then gets copied to the accumulator by the TAX instruction. Then it sets 3 of the four upper bits leaving the most significant bit as zero using the ORA instruction. Finally, the combined values are written to the register which actually updates things on the cartridge board.

The $70 value (0111 0000 in binary) is what controls the LEDs. For the two LED bits zero means turned on and one means off. The green bit is left zero and the red bit it turned to one and so that’s why we normally end up with only the green one turned on most of the time. The code EYKYPYAY changes the $70 to $F0 (1111 0000 in binary) so that both bits are set and so both lights are off.

F740 ORA #$F0

The code ALKYPYAY changes it to $30 (0011 0000 in binary) so that both bits are turned off which turns on both lights.

F740 ORA #$30

Finally, the code ELKYPYAY changes the value to $B0 (1011 0000 in binary) so that just the red LED is turned on because only its bit is cleared.

F740 ORA #$B0

Obviously, it only makes sense to use one of these three codes at a time since they all affect the same address in memory.

Skip loading saved data

You might think that this last one is a little odd–and maybe it is. As you know, The Incident saves your progress to the cartridge so you can resume playing from the same previous state even if you powered off the console between sessions. The way it accomplishes this though struck me as a little odd.

The 6502 processor that powers the NES has a special region of memory known as the “zero page” which really just amounts to the first 256 bytes of RAM. Accessing this memory is a little faster than the rest of RAM and it has some other super-powers that make it prime real estate. So, not terribly surprisingly, The Incident keeps pretty much all the vital game data in this space like the current level, solution points, and everything else that gets stored between play sessions.

What I’d generally expect to see from any program is that, when saving important data, the information gets neatly packaged in a dedicated data structure and then written to the storage medium just as a desktop application would store data to a file. The Incident doesn’t do this and instead just writes the entire zero page directly to the flash chip. This does write out all the vital information it wants to save but it also stores lot of other more tenuous state information that inhabits the zero page that really doesn’t need to be saved, is not useful when restored, and it just along for the ride.

From a purely efficiency based perspective this is quite clever since there’s no need for fancy packing and unpacking subroutines–the information is just loaded directly back into the zero page when the game is rebooted. There is a theoretical danger with this approach though since the game is not merely reloading the game but its actually reloading parts of it previous state of execution. Generally, a program likes to start from a cleanly initialized state but this causes it to have information restored that might then need to be handled or just otherwise explicitly discarded. In principle, if the game had a malfunction and stored bad state data then it might prevent itself from running again even after a reboot since it wold just continue to load and run in an invalid state.

In practice, I’ve never actually encountered this so it’s not a real problem at this point as far as I know. More to the point though is that The Incident has a built-in function to erase the saved data but all it does is reset the data points associated with the game progression. It doesn’t actually wipe completely clean the portion of the cartridge storing the data like it is again brand new and this just rubs me the wrong way for no particularly good reason.

So, to bring this all together, the purpose of the SZUVPAAX code is to let you “start fresh” by skipping the load of the zero page data when the game first starts. Since all of RAM is erased at the very start of the boot process (pretty much all games do this) it means we end up starting from a zero-page that is completely zeroed out just like it would have been when the game was run for the first time. This really has no practical effect that’s any different than just using the erase function beyond soothing my paranoid psyche. However, if you did ever end up with a corrupted zero-page that prevented the game from rebooting this code could potentially rescue the cartridge by effectively purging the bad data.

The code itself is pretty simple. Early in the startup sequence at $E039, a call to the function located at $D3DA is made. The purpose of this function is just to copy the saved data from flash memory on the cartridge back into the zero page.

E039 JSR $D3DA

Again, we just change the JSR instruction to load the accumulator register from that address instead of jumping to the subroutine. The side effect of changing the register doesn’t matter since the function itself would have left the register in an undefined state after it returned anyway.

E039 LDA $D3DA

Wrap-up

Thanks for reading this far! I figure if anyone actually looks at this post then most will stop after the codes. I wanted to explain the codes a little bit but I didn’t mean to write this to be as long and it ended up being. If this does become a series of posts then I might just skip the explanations in the future but I hoped you enjoyed them none-the-less; writing Game Genie codes really is kind of a neat process.

An analysis of the Legends of Owlia password system

I’ve always been fascinated with video games that included “passwords.” There’s something mysterious and exotic about the whole idea. Especially as a child it gave me feelings of intrigue and mastery as if I was at the apex of some grand conspiracy. Games which framed the input of their passwords in this way undeniably contributed to this as did publications like Nintendo Power’s Top Secret Passwords Player’s Guide.

Of course, the wonder I experienced as a child falls away somewhat when you consider the business reasons for why game passwords were originally created and the fact they are really little more than tiny fragments of serialized data. Despite all that, I find that I still really like the idea of it beyond simple nostalgia and also especially enjoy the challenge of deciphering the coding systems and creating my own customized passwords. I’ve personally dismantled password systems from a number of classic games and learned some things about how they work and how they were put together in the course of it.

With my recent entry into the world of Nintendo homebrew I was delighted to find that the tradition of password driven NES games continues. Whether this is for purely nostalgic purposes or is still driven by the more pragmatic concerns of the developer isn’t always apparent to me but either way it has some intrinsic value in my opinion. I’m excited for the chance to study the creations of modern NES developers in comparison with classic titles.

My first victim, as it were, is The Legends of Owlia by Gradual Games and I’ll give my micro review of it right here: A good game but I wish there was more of it. This will be the first non-classic password system that I’ve deciphered and I’ll be speaking quite frankly about what I’ve found in comparison to other systems that I’ve seen. I don’t mean to be overly critical or for this to be taken as denigrative of the title. This was a game that I enjoyed playing and seems pretty well put together; I probably wouldn’t have expended all this effort on it if I had felt otherwise.

Encoding

Passwords in The Legends of Owlia are 10 characters long and use all the capital letters and all ten numerical digits as possible characters. This means that each character is one of 36 possible values or about 5.2 bits worth of data. Only 32 of these characters are actually used with the digits 6, 7, 8, and 9 being decoys that are never used in a valid password and automatically invalidate the entry if the player ever enters them into the game.

The use of decoys is common and is often employed by games to make it harder to randomly guess correct passwords or to just round out the set of possible inputs. In this case I think it’s the latter since Owlia presents the input selection as a nice 6×6 square matrix. A common alternative is to throw out completely one of the characters in a pair that are often confused for one another. So, Owlia could have just created (but did not) a 32 character set and threw out number 0 because it looks like letter O or throw out letter I because it looks like number 1 and so on. Neither approach is clearly better than the other.

Post2-Pic1

Owlia probably only uses 32 characters because that gives an even 5 bits of data per character and it is much easier to work with even bits than a fractional number. This means that the full 10 character password carries 50 bits or 6.25 bytes of encoded data. Each character represents a single number from zero to thirty-one and when you convert each character to the corresponding binary number and then paste them all together one-after-the-other you get the full 50 bits of data:

Post2-Pic2

Game passwords generally want to appear as random jumbles of letters and numbers and one method of creating this apparent randomness is to assign numeric values to the characters at random. This requires a lookup table to be built into the game so that it finds the value that was assigned to each letter as the user enters it. Owlia doesn’t do this and instead follows the much more straight forward approach of assigning the numbers in alphabetic sequence and then numeric sequence after that.

This means that the character A is equal to zero, B is equal to one, and so until Z which is equal to 25. The missing six values are assigned to the digit zero starting at 26 thru the digit five ending at 31. Since the numbers are assigned in a logical sequence they can be converted through a simple algorithm. The downside of this is that the password will appear much less random especially at the start of the game when most bits are zero (the password would contain mostly A characters).

Owlia achieves the appearance of randomness through another common technique used by many other games before it. This is the only method employed by Owlia to scramble the password and it is effective on its own but it’s also not uncommon to see it combined with one or more other techniques in other games. The technique used here it to split the raw password bits out into bytes and then scramble each byte using exclusive-OR.

The 6502 instruction for exclusive-OR is EOR and it operates on each pair of bits between two bytes; one in the accumulator and one from an immediate value or a memory location. It’s not technically accurate to say this but, for all intents-and-purposes, this means the NES can only XOR complete 8-bit bytes which creates a slight challenge with the 50-bit value that we have. The only solution I’ve seen for this—and the only one that I can think of—is to just split the 50 bits into bytes and encode each one individually which is exactly what The Legends of Owlia does:

Post2-Pic3

Two things might catch your attention in this illustration. One is that two bits are missing near the end. The other is that when decoded nearly all of the bits in this example password are zero.

The reason for the missing two bits (25 cents?) is because fifty doesn’t divide equally by eight but forty-eight does. Strictly speaking, there’s no reason why the game couldn’t have made use of these two bits in a fractional byte since it’s much less difficult than fractional bits. For whatever reason though the game doesn’t seem to need them and so chose to discard them which results in the final raw decoded password being 48-bits long or exactly 6 bytes.

Post2-Pic4

Some form of unused or wasted space is actually very common with various password systems. Most games’ passwords have a few spare bits that are always zero in game-generated passwords and are not validated when the password is decoded. In those cases and in this one specifically, this creates some space where hacked or otherwise custom generated passwords can insert a little extra data without invaliding the password. This could be used as a form of watermark or for another purpose. In this case the two bits don’t provide much extra space but you could still set these dropped bits to create versions of any password the game itself would never generate but that it still accepts.

As for the decoded bits being almost all zeros, this is interesting for two reasons. First is that the example password used in the illustrations is the first password the game generates immediately after starting a new game. In this password basically all things the password tracks like items collected or doors opened haven’t happened yet so they are all zeros and this is reflected quite clearly in the decoded raw password bits.

Second, since the password itself is just a big zero-block the letters and numbers of this password itself basically reveal the key used to decode it. This is because when XOR is used to scramble data the effect is just that any bits that are set in the key simply invert those corresponding bits in the data. This allows the encryption to be performed or reversed by just XORing the data and the key each time. In this case since nearly all the data bits can be assumed to be zero we know that nearly all the bits that are set in the password are set because they were inverted which in turn reveals which bits are set and not set in the key.

This basically makes it trivial to derive the key and decode—or encode—any password but this is only easy because Owlia doesn’t employ any other protections or randomizations on the data. As discussed earlier, the numerical value for each character is easily predicted but if they had been scrambled with a lookup table or another method it would have been much harder to crack by hand. In the next section as we delve into the actual payload of the password we’ll continue to see that protection of the data and prevention of tampering didn’t seem to be a big design goal for this particular system.

Data format

In the last section we reversed the encoding procedure used by passwords for The Legends of Owlia and revealed the password’s raw data bits which turned out to be a 48-bit value or just a block of 6 bytes. We know these bits contain all the information the game “saves” between play sessions because when we enter the password certain things like money, items, and the current level are restored. Therefore, we know this isn’t just a single long number but actually multiple individual values or numbers, which I will refer to as “fields,” that must all be smushed together to from the one larger value.

So, our next task is just to separate out the individual fields so we can see exactly what data is being carried by the password and how it’s being stored. At this point, since we’ve decoded the raw bits the easiest thing to do is just gather some different passwords and remember what we did in the game in-between those steps. Then we can just see which bits are changed by doing those things which reveals the location and purpose of the different fields within the longer binary value.

For example, the first thing I did was to get some passwords with different numbers of bombs, lanterns, and hearts (health) since these are easily collected at any point in the game. This technique allowed me to pretty quickly and easily break apart the password into all the separate fields which, for the sake of brevity, I will just document in illustration below:

Post2-Pic5

As we can see, the values are neatly packed in a simple way that makes it easy to find and understand the value. All the bits of a single field are grouped together and are consistently stored left-to-right with the most-significant bits first. This continues the theme from the encoding where it seems like the game doesn’t care too much about trying to prevent someone from cracking the code, as it were. The developer could have tried to scramble the order of the bits which would have increased the complexity of the encoding and decoding programs but would have also made deciphering the meaning more difficult.

We’ll start with the simplest and easiest fields. The fields labeled E, F, and G are, respectively, for the number of Bombs, Lanterns, and extra Hearts (“Health”) held by the player as seen on the pause screen. Nothing fancy here and all possible values from zero to seven are used as expected to just mean the number of the particular item held. Since only tree bits are allocated to each it means the maximum number of the item has to be only 7 (since 3 bits gives only 8 possible combinations including zero) which explains the reason why the cap isn’t 9 like we might have otherwise expected.

Field I is the heart of the password in that it keeps track of overall progress through the game. You could describe this as the “level” the player is on since it gets incremented each time a dungeon or major milestone is passed. This value starts out initialized to 1 at the start of the game and so is the only field which doesn’t start as all zeros. It increments to 2 when you speak with Silmaran in the forest and then once again after clearing each dungeon.

Value Level After Event
0 Not Used Breaks password
1 Town New Game
2 Forest Met Silmaran
3 Tundra Beat forest dungeon
4 Mountain Beat tundra dungeon
5 Island Beat mountain dungeon
6 Docks/Submarine Beat island dungeon
7 Mermon’s Fortress Beat submarine dungeon

This part of the password is very well designed. Some of the other systems I’ve seen have really messy methods of tracking the game progression using multiple fields that can conflict in odd ways. In those cases it’s often possible to write passwords were the system accepts the password but the game is in state which can’t be completed (although I guess shame on us from trying to break it like that?). That’s probably because those games just dump raw variable values from RAM directly into the password. I suppose that works but it’s messy and is not as efficient space wise. Owlia‘s approach on the other hand is just to increment this master-counter during major transitions and then supplements that with additional fields that get reused per level which we’ll discuss next. This is a very clean and efficient approach and I like it a lot; kudos to the developer on this one.

The single-bit entered-dungeon flag plus a byte of dungeon-specific flags are in fields B and C respectively and these fields are reset and reused each time the primary counter is incremented. For the dungeon flag it gets set once you first enter each of the five dungeons from their respective overworld or enter the submarine from the docks. Once the flag is set the game always starts at the dungeon entrance until the captive owl is rescued  even if you exit the dungeon and collect a new password.

The flags byte is just a collection of eight on/off switches and each one tracks whether a particular key has been collected, a particular door has been opened, or a specific chest has been opened. This field is really important to allowing you to save and resume your play of a dungeon since it basically tracks how much of the overall level has been solved. There are only eight of these flags though which is why it’s important that the field gets cleared and reused in each dungeon. Since the field is reused the meaning of each bit varies by each dungeon and not all the dungeons use every bit since they don’t always need all of them.

Bit Forest Tundra Mountain Island Fortress
1 Key 1 Key 1 Key 1 Key 1 Key 1
2 Key 2 Key 2 Key 2 Key 2 Key 2
4 Door 1 Door 1 Key 3
8 Door 2 Door 2 Door 1 Chest Key 4
16 Chest Chest Door 2 Key 3 Door 1
32 Chest Door 3 Door 1 Door 2
64 Chest Door 2 Door 3
128 Key 3 Door 3 Door 4

Overall, this is excellent execution and much better use of space then I have seen in some other systems. It’s worth noting the game doesn’t seem to validate the flags so you can enter combinations that don’t make sense such as unlocked all the doors but claimed no keys. It also doesn’t care if data is present in bits that are unused or for a “level” like the town or the docks that don’t use the flags at all. In those cases this is a little bit of additional unused space where extra data could be hidden but it’s not consistently available.

Field H is a little bit of a disappointment coming out of the previous discussion. This field is just a counter for the current number of keys held by the player. That is it’s the number of keys that have been found but not yet used to open a door. It’s really just wasted space because this information could easily be recomputed from the flags by counting the number of keys found and subtracting the doors opened. Three bits are used since the player might have anywhere from zero to four keys (5 possible values). The game doesn’t validate this value either so you can give more keys in a custom password than the game would ever award normally. I think this field was just added for programmer convenience but it’s not strictly necessary.

That leads us into the final remaining field but this last field covers half of the total bits in the entire password. This field took me the most time to identify and fully understand because it defied my expectations. Just from playing the game first I knew that money (GP) in the game was always collected in increments of 100 GP so the player’s total GP was always evenly divisible by 100. I also assumed (correctly this time) that the GP cap was 999,900. This means the password could store any amount of money using only 14 bits because it could be saved as a multiple of 100. I expected to find that 2 of the remaining bytes were used for money and the third for another purpose but it wasn’t working out and kept confounding me.

I eventually realized that all three of the remaining bits formed a single 24-bit field which is for the exact number of GP the player has. Bits marked A are the 8 least-significant of this value, followed by bits J in the middle, and bits D are the most significant. Since this value is 24-bits it can save any (unsigned) number from 0 to 16,777,215 but only 10,000 of those values are possible to appear in a valid password. This works out to a utilization of roughly 0.06% and so this is a large waste of space.

The other field I was expecting to find was a checksum field which was used to validate the entire password. Every other system I’ve investigated has included a field which is computed from all the others using some algorithm (usually simple addition) and this is normally what allows the game to tell the difference between something valid and a player just trying to enter random numbers. When the password is reentered, the same value gets recomputed and if the recomputed value matches the one in the password itself then the password is accepted and otherwise it gets rejected.

Owlia doesn’t have this and it was a bit unexpected to find it was missing. Owlia still has some mechanism for checking the password but it works differently. When a password is entered into Owlia the game checks to make sure the value of each field is valid and rejects the password if one or more fields are invalid. The issue with this is that the only fields that can contain invalid values are the GP and event counter fields. All the others are valid with any possible value so there’s no way to invalidate them. It can also reject the password if the dungeon bit is set for a level that doesn’t use it (e.g. the Town).

Since 50% of the entire value is covered by GP bits and since that field has such a low ratio of valid values it means that any random entry is still very likely to be rejected. For this field, any value that is larger than 999,900 or that is not evenly divisible by 100 is invalid and breaks the password. Any random combination that you punch in is likely to not meet these constraints and so does get rejected. However, the third, sixth, and seventh characters of the password do not contain any bits for the GP value and so you can change these values freely on any otherwise valid password and get it to work 100% of the time—try it and see! The eighth character contains the event counter which is also going to be valid most of the time so you can also change it and have it work in most cases.

This validation approach is less comprehensive than the more common checksum approach (some games do both) because it ends up leaving some of the characters “unprotected” from tampering. This seems to continue the theme from the previous section where the “security” of the password is not a large concern for Owlia. There really isn’t anything wrong with this; the developer doesn’t have to be trying to prevent players from casually modifying passwords. However, this also creates a usability issue since when I enter a password, I expect it to work only if I enter it correctly and for the game to catch my mistakes. Since nearly half the characters can accept any value it means that I can easily make a mistake and still have the game accept it. For the third character especially this could be a problem since that contains flag values which if incorrectly restored could remove some of my progress or worse leave the dungeon in a state where it’s impossible to complete it.

To conclude my commentary on this, the Owlia system makes a really strong showing on the tracking of progress and state information doing this part elegantly and efficiently. It falls short on overall space efficiency though and on data validation. My recommendation on how this system could have been improved would have been to allocate only 14 bits to the GP value as I described earlier. I would then suggest allocating an additional 5 bits to some form of checksum. This would improve the data integrity issue and use only 40 bits which means we could shorten the password to just 8 characters. This would improve the player’s experience by reducing the number of characters that have to be entered and be more likely to catch input mistakes. An additional optional change would be to jettison the keys field entirely since that value can be recomputed from the flags data. We could then add those bits to the checksum for added validation strength or use them for another purpose entirely.

Custom passwords

My intention with this article wasn’t really to teach the reader to encode or decode the passwords themselves (although there is definitely enough information here for that if you want to try) but just to break it down and examine the strengths and weaknesses of the system in comparison to others. However, when I’ve made similar write ups in the past I always included a table of custom generated passwords. So I’ll continue that tradition and end on this table of passwords that will take you to any point in the game with 100,000 GP and all the items maxed out.

Level Step Password
Town Overworld GCSKIHKRFW
Town Dungeon
Town Boss
Forest Overworld GCSKIHKSFW
Forest Dungeon GASKIHKSFW
Forest Boss GAVSIHKSFW
Tundra Overworld GCSKIHKTFW
Tundra Dungeon GASKIHKTFW
Tundra Boss GA3SIHKTFW
Mountain Overworld GCSKIHKUFW
Mountain Dungeon GASKIHKUFW
Mountain Boss GBMSIHKUFW
Island Overworld GCSKIHKVFW
Island Dungeon GASKIHKVFW
Island Boss GBMSIHKVFW
Docks Overworld GCSKIHKWFW
Docks Dungeon GASKIHKWFW
Docks Boss
Fortress Overworld GCSKIHKXFW
Fortress Dungeon GASKIHKXFW
Fortress Boss GBNSIHKXFW